About Photo Link


Tuesday, January 17, 2017

Bill of Rights Children's Book


I was trying to think of a fun way to teach the Bill of Rights, together my PLC came up with students making a children's book that explained each amendment! The students loved this activity as they love everything creative and it helped them cement the amendments in their brain a little more. The instructions were simply to make a children's book that included each amendment in the Bill of Rights with elementary student friendly language explaining what each amendment means as well as a picture. They all turned out really well! We took twenty minutes to have "story time" where everyone had a chance to read their book to their group. They had a blast.

Although this activity was fun, I have plans for next year involving a Bill of Rights board game that students would create....stay tuned. :) 

Friday, January 13, 2017

Graphic Organizer-Improve Student's Writing!


Often, my best ideas come to me when I'm mid-lesson. 
I think of the idea and switch gears completely. 
It doesn't happen often, but the few times it has, amazing results come to pass.

One day, I was teaching a lesson about writing to my gifted students, preparing for the state mandated test that was looming. I was getting so frustrated with them because their body paragraphs were unorganized and just generally a mess. They were writing to find their idea and it made the paragraphs not as powerful.

I started drawing on the board how they should flow their thinking before they start writing an essay, and I ended up coming up with what my students call, "The Chicken Feet Chart" and it has 100% changed my student's writing. It has made their whole essay organized perfectly. 
I'm excited to share it with you today! 

The chart itself is just laminated paper and students use skinny expo markers on it. Also, don't run them through the dishwasher. #LessonLearned.


The first line on the side, number 1, is their claim. I found this prezi about claims and have used it ever since. Students understand it because it's very formulaic.  So on line one they write their subject and what they think (without using first person, of course). Then their three reasons go on line 2, 10 and 18. 
So, if I'm writing a paper about the negative effects of the Industrial Revolution, my chart would look like this...


Then comes the most important part of this chart, the sub reasons, lines 3, 6, 11, 14, 19, and 22. It is important because it focuses each paragraph. Each main reason has two sub reasons, also known as chicken toes that focus the topic. Your main reasons should be more broad so that your sub-reasons can be focused. Here is what that looks like for my chart....


Next comes evidence. I require students to have two pieces of evidence (IN QUOTES) per paragraph. So they have one piece of evidence to match their sub-reason. On their chart, there isn't enough room to write their quote, so I have them put the page number if it's a book, or just the first few words of their quote so they can go find it later. This is what it would look like...


After evidence comes commentary/explanation/elaboration, lines 5, 8, 13, 16, 21 and 24. Commentary/explanation/elaboration is such a hard thing for my students to understand for some reason. They understood it a little more when I told them this is where they do the thinking for their reader. Their reader wants to think critically about a topic but their reader is lazy and doesn't want to think for themselves, so you have to give it to them completely. We're still not quite there yet though. I made them the following sentence stems to help them, and it has made a difference.
On their chart, they just need to write their sentence stem and they know to elaborate on their commentary later on. 

Then, they have their transition line which I call their shoelace transition. This is lines 9,17, and 25. This is where they take their subject from paragraph one, their subject for paragraph two, and tie them together in a bow, aka one nice sentence. So for my paragraph one and paragraph two, I would transition like this....
"Children not only had bad conditions at work, but they also had them at home." 
My transition from second paragraph to third is, "The problems in the cities were of little concern to those profiting off the factories that were causing these problems."
Students really understand this concept because of the metaphor to tying your shoes.


Lastly, the bottom line is for the counterclaim. We obviously don't use this when we write informative essays, but when we write argument it is super useful.
This is how I have it set up...


After students fill out the chart, they are ready to type. I let them choose if they want to type it straight into a google doc, or if they want to use this document. This document basically says, "type line ten here, type line twenty six here, etc."
It helps my students that don't get how to go from the chart to the essay.


Then they just add their intro and conclusion, which we have explicit lessons about and review ad-nauseam.

This chart, though my students don't enjoy it all the time, helps their writing. It helps them understand how to visually represent their thinking and again, very formulaic which helps my students who struggle with writing.

Try it in your classroom and see if the student's writing improves! I'm sure it will. My students chant the motto, "BELIEVE IN THE POWER OF THE CHICKEN FEET CHART!" because their scores improve when they use the chart. I love seeing the look on their faces when they realize how their writing has improved since using this graphic organizer.

Here is a student example with their essay they wrote about Animal Farm...

Feel free to borrow or steal my idea, no need to beg! :) 

Thursday, January 12, 2017

Women of the American Revolution Activity


This was a new activity that I came up with this year. That's right! No begging, borrowing, or stealing. It just came from I just get really sad that we don't get to teach WW2 in our school. That is saved for the high schools. So I have gotten clever about how to weave it in. In this lesson, I start talking about Rosie the Riveter and do a little mini lesson about her and her role in WW2. You can see the slideshow I used here.

So we talk about Rosie the Riveter and what she did.  Then students do a gallery walk with bios from different women from the Revolutionary war. These women are Deborah Sampson, Nancy Hart, Mary Katherine Goddard, Esther Reed, Lydia Darran, Sybil Ludington, and Margaret Cochran Corbin.  They have to write down the women's names and what they did for the war.

The last task they have is to draw a poster demonstrating what their chosen woman did in the war. They have to "show the action" and create some sort of catchphrase to convince other women to also join the war effort.

This was a great activity and the students loved all of it from start to finish. They eat anything about WW2 up since they don't get it very often. They loved getting out of their seats for the gallery walk and drawing/art always engages the students I can't reach. The best part is that this fits perfectly in an hour long block!


Go women!

Monday, January 9, 2017

Women's Suffrage Graphic Novel


I tend to be a little vocal about my feminism in my classroom. My students see my "Women Belong in the House and the Senate" shirt very often. So it's no surprise to them that one of my favorite lessons of the entire year is about women's suffrage. I love to teach them about Susan B Anthony, Seneca Falls, the hunger strike in jail, all of it! My favorite video of the year is this really well made video to the tune of Bad Romance, a Lady Gaga song.

I found this lesson on Teachers Pay Teachers and it is one of my favorite finds from that website. It is a lesson that "History with Mr. E" created and it's amazing, worth $5.00 and then some!
It starts with a great primary source activity that introduces key concepts from the struggle for suffrage. I put students in groups and they analyze the source using questions that are provided in the lesson. Afterwards we discuss the sources as a class and I give background. The students are usually so entranced that I don't make them take notes. We watch a few videos, one from the clip above, another from the Suffragette movie that recently came out. Then they are give the second part of the lesson, the graphic novel.
Students are required to create a graphic novel that tells the story of how women came to get the vote through the major events that were discussed in the primary sources. Students LOVE this activity because it allows them to be creative. One student did the whole story with bees being the women "Susan BEE Anthony" and ants being the men. It was amazing. It really makes the whole journey solidify in their minds.
I would highly recommend this engaging lesson using primary sources to educate your students about women and the right to vote! Thanks to Mr. E for letting me steal this lesson. You can purchase it here.


Sunday, January 8, 2017

Body Biography Activity

Don't you love when you find an activity that actually went swimmingly the first time around? Good enough that you can use it again the next year? This honestly hardly ever happens to me! However, I found this activity last year when I was desperate for an activity to go with the novel A Light in the Forest. I read this with my American Studies students (gifted class, combined English and History). I love teaching this novel but there are absolutely no good activities online for this great book! It's a bummer for a begger/borrower/stealer like me! :) I've had to get creative and honestly, I don't always have time to do that. So I was stoked when I found this activity on TPT. Best part?? It's totally free. Go download it NOW. Find it HERE. Major props to Danielle Knight for creating such a great resource.


 This activity deals a lot with symbolism, which is a great way to teach them what that means. After reading the novel, students had to think about certain things to place on the poster. For example, the heart represents what the character loves most. The hands should be holding what the character seeks to control. The eyes should represent how the character appraise to others on the outside. There are about 10 things that the student needs to include, including outside sources and quotes from the book. The students have fun with this every single year. They think tracing their bodies are so funny! It also gets super chaotic in my room trying to fit 12-15 of these huge posters on the floor but the kids love it and have great discussions with their groups as to what to include on the poster. It's a great wrap up activity because they have to go searching all through the book to find information for their poster. 

I would highly recommend this activity. I love seeing what the students come up with!

Isn't this poster amazing? This was from a student who never does anything for me. I wanted to laminate it but it was too big for our laminator! It also had 2/10 things it needed to have on it...*sigh*. 

Thanks so much to Danielle Knight for letting me steal this activity! I'm a huge fan.

Wednesday, January 4, 2017

Preamble to the Constitution Activity


Ohhh, teaching government. I have such a love/hate relationship with teaching government. I have some fun simulations but I also have some days that are a little painful for both me and the students.
Last year I really messed up the preamble. It was a painful train wreck of a lesson. So this year, I set out to figure something else out. 

While searching around online for different lesson ideas, I often find lessons that are half complete or don't totally make sense and I have to piece them together using parts of what I found and the rest of it comes from my imagination. It's actually kind of fun! 

I start with a small group simulation where they are stranded on a desert island and they have some problems they need to solve (all relating to parts of the Preamble, they figure this out later). You can check out the simulation [for free!] here.

After we have a discussion about the problems that the colonists had after the revolutionary war, the preamble is introduced. Then the poster project is introduced.

In groups, the students have to brainstorm three ways our government is currently upholding a specific part of the preamble. Students were a lot more creative with this than I thought they would be! A popular topic was Obamacare for "promote the general welfare." Then students create a poster explaining those three issues, writing a letter to the current president from a founding father giving him advice about how to work towards their assigned part of the preamble. They also have to assemble hashtags that relate to their part of the preamble. 
At the end, we will do a gallery walk where students walk around and note the different issues related to the preamble. 

It was a pretty quick little lesson! It took my kids two class periods (two hours) to do the poster and the gallery walk.

Find the activity worksheet [for free!] here.

Thanks for letting me steal, random teacher on the internet! Unfortunately I didn't save the website because it didn't have a ton of information on it, a lot of it I had to piece together myself.

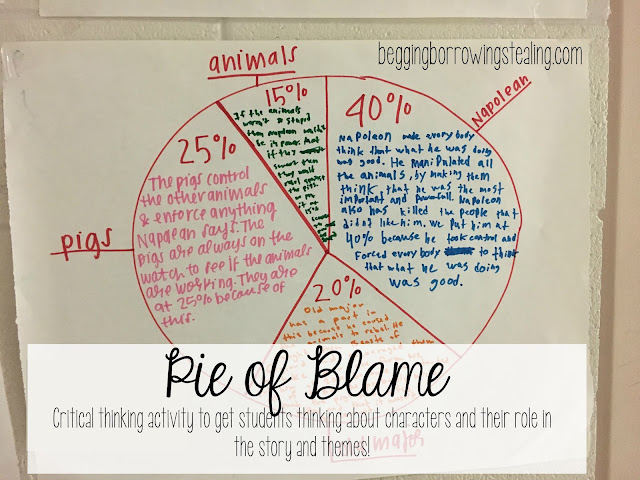
Pie of Blame


I started teaching Animal Farm last year and I love teaching it with all my heart. Especially in our current political climate, kids make so many great connections no matter where on the political spectrum they land.

The ending of Animal Farm coincided with Christmas break, so I wanted to do something on topic but different than anything else we have done. One of my colleagues went to NCTE and came home with this lesson called the Pie of Blame. Basically, students have to assign which characters what kind of blame for the resolution of the book. If you are familiar with Animal Farm, I asked them which animals were to blame for the state of the farm.

I have been struggling with my honors students to get them to have the types of conversations that my gifted students have. This activity was just the thing I was looking for. I have never seen any of my students as engaged and passionate as they were while they completed this activity. I loved how engaged each of them were as they were arguing why Napoleon should have this percentage, why Boxer should be included, etc.
All in all, it only took about 15-20 minutes. I didn't have them present, I would have liked to have time for that but we had a shortened schedule so it didn't work out.

If you would like to see the powerpoint I used with the instructions, you can see it here.

I would highly recommend this lesson. You can use it with any novel and it will foster great discussion in the classroom.

Thanks for letting me steal!